
Japandi Kitchen: How to Blend Japanese & Scandinavian Style
A Japandi kitchen is essentially Japanese and Scandinavian design put together in the form of simple forms, natural textures and furniture that’s there to serve you in the everyday. You start with a workable layout, select a small number of finishes and then use the timber, the colour and the lighting to bring warmth and definition to the room.
The best place to start is often with an existing surface of some kind (an oak floor, cream tile, a wooden table etc that you’re keen to retain). That piece will then inform the next choice. A kitchen can be very coherent without every cupboard, every chair and every little item being from the same collection.
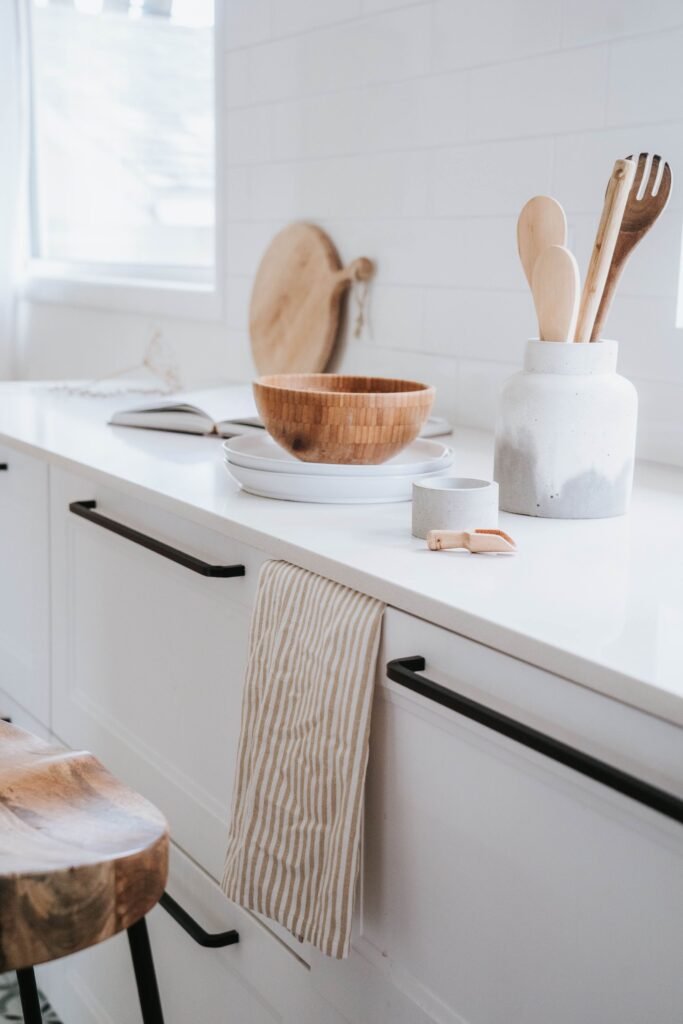
What is Japandi kitchen design?
Japandi is a modern interior style that blends Japanese and Scandinavian influences. IKEA describes Japandi as combining Scandinavian practicality and simplicity with the clean lines and gentle feel of Japanese design.
In a kitchen that can mean plain cabinet fronts, visible wood grain, a fairly restrained palette of colours and plenty of storage to make the prep area actually useful. The choices should be ones that reflect how you actually cook and how you gather. A coffee machine, a dish rack, a favourite bright bowl can all have a place in a kitchen that’s been arranged around the use of it.
Our Scandinavian interior design guide looks at light, materials and function more broadly. For a Japandi kitchen you could go for a deeper timber tone, more discreet cupboard detailing or a greater contrast between the surfaces. Again these are just design options rather than a rigid formula.
Start with one material you want to keep
Look at the floor, the worktops and the big bits of furniture first when you’re choosing paint. Take a photograph of the room for reference but actually compare the physical samples in the kitchen. A door sample that looks quite a pleasant beige in the showroom can look quite pink next to your floor.
Choose one timber tone to lead the scheme. That could be pale oak cabinetry, a walnut dining table or an existing shelf. The other wooden pieces can vary but you do need to look at the undertones of all of them. A small difference in finish can be quite attractive. A whole kitchen of almost matching samples can be a very difficult thing to resolve.
Then pick a quieter surface to sit alongside it. Strong grain timber might be the ideal companion to a plain worktop. A patterned stone surface might be better suited to simple painted fronts. Decide which of the materials you want to be the one that you notice first as you walk into the room.
Three original Japandi kitchen palettes
These palettes assign a purpose to each colour. They are starting points for putting together samples with the name of the material describing the appearance it’s intended to give. The digital swatches are original illustrative colours, not manufacturer paint codes or actual representations of timber and stone.
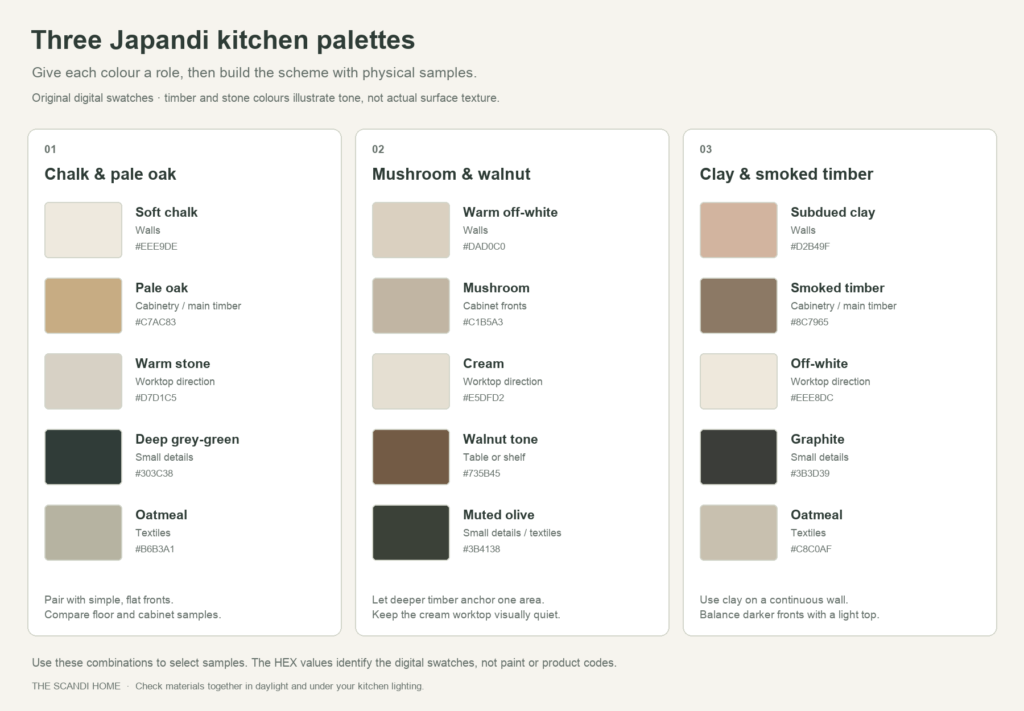
1. Chalk and pale oak
Use soft chalk walls, pale oak fronts and a warm stone coloured worktop. A touch of deep grey green in the handles or a light fitting will give definition to the lighter surfaces. Textiles should be close to oatmeal or natural linen.
This is a good approach if you’re after a light room but still want to show the grain. Take the worktop and wall samples and put them together as a set. Two very pale surfaces can be quite different in terms of their undertones. If you already have oak on the floor then use that as your reference when you’re selecting the cabinetry.
2. Mushroom and walnut
Pair the mushroom coloured cabinet fronts with a walnut toned table or shelf, a cream worktop and warm off white walls. A muted olive can be used to tie the ceramics or textiles into the scheme.
Keep the deeper timber in one area so that it becomes a feature. If you already have a dark table then try this combination around it before you go any further. Look at the samples under the evening light as well as by the window as you may find you want less dark material in the areas that get very little daylight.
3. Clay and smoked timber
Combine a muted clay wall colour with smoked timber, an off white worktop and some small touches of graphite. Oatmeal fabric will be used to soften the transitions between the darker cabinetry and the lighter elements.
Use the clay in a continuous area such as the dining wall. Check the full size cabinet sample prior to committing to a long dark run. If that seems too heavy for the room then keep the timber on an island or piece of furniture and go with lighter fronts elsewhere.
| Palette | Walls | Cabinetry or main timber | Worktop direction | Small details and textiles |
| Chalk and pale oak | Soft chalk | Pale oak | Warm stone tone | Deep grey-green; oatmeal fabric |
| Mushroom and walnut | Warm off-white | Mushroom fronts; walnut-toned furniture | Cream | Muted olive; a simple woven textile |
| Clay and smoked timber | Subdued clay | Smoked timber tone | Off-white | Graphite; oatmeal fabric |
Sample the biggest surfaces first. A small handle or tea towel is far easier to change later on than a worktop which has been selected to match a screen image.
Choose finishes by construction and care
A material’s name tells you nothing at all. The IKEASINARP oak-veneer front is a case in point. It has a particleboard core, oak veneer faces, solid oak edges and a lacquered finish. That’s a very specific product with very specific care requirements. A solid oak worktop is a different product again. An oak effect laminate is a different product still.
For worktop options and current price examples the Scandinavian Kitchen Guide compares oak, ash, birch and laminate. You need to decide on the look and the level of maintenance required together, particularly in the sink and cooking area.
A practical finishes list
| Part of the room | Finish direction to explore | What to confirm with the supplier |
| Cabinet fronts | Plain lacquered veneer or a kitchen-rated painted or matt surface | Core, face and edge materials; cleaning instructions; how damaged fronts can be repaired or replaced. |
| Worktop | A quiet stone appearance, suitable laminate, timber or another surface you like handling | Heat and stain care, joint details, cut-out requirements and the finished edge. |
| Splashback | A simple washable surface with restrained pattern | Suitability behind your appliance and around the sink, including installation and cleaning requirements. |
| Handles | A simple bar, knob or integrated pull | Comfortable grip, projection, cleaning access and how the finish looks with the tap and lighting. |
| Walls | A finish suited to the location and expected cleaning | Washability, preparation and any areas requiring a separate protective surface. |
| Floor | A finish that works with the retained timber and cabinetry | Care, water exposure, movement joints where relevant and suitability for the room’s use. |
| Dining furniture | Timber or another familiar material with a comfortable seat | Finished table height, chair clearance and surface care. |
Matt surfaces vary. FENIX’s own care instructions actually state that abrasive creams, scouring pads and hard brushes can create a glossy area on its matt finish. They recommend simply rinsing and drying. Always use the instructions for the exact material you have selected as a similar appearance does not mean the same cleaning method.
Keep a short record of the product (i.e. the product name), the colour, the finish, the edge and the handle for each area. That way it’s much easier to compare the quotes and you won’t end up with a different surface that has a similar name.
Keep cabinet lines simple and storage useful
Align the doors and drawers where the cabinet system will allow, but start with what it has to hold. Measure your pans, your trays, your small appliances before you go and buy the internal fittings. A cupboard which neatly conceals a mixer is of limited use if you can’t get at it.
Use open shelving sparingly. A shelf for your day to day cups is a good way to introduce some timber and ceramics without actually filling the wall. Less frequently used items can be placed behind doors if you prefer that to be a bit easier to clean and to have a quieter background.
Handleless cabinetry is an option. A visible handle can provide a repeated element and make the door easier to use. Test the pull from the positions where you’ll actually be standing (including lower drawers and tall storage). Get the operation right first before you go too far down the line with regard to how discreet it should be.
Make the layout work before adding an island
A Japandi kitchen can be a single wall, a galley, an L shape or a larger room with a table. It doesn’t necessarily require an island or a large floor area.
Keep a workable prep area and check the main flow paths with the drawers and appliance doors all open. In an open plan kitchen consider how one person is going to reach the table while another is cooking. A decorative stool should not be in the space required to load the dishwasher.
For such a small room these galley kitchen layout ideas are pretty good in terms of providing opposing runs and ideas for storage and lighting. You’d be well advised to give a proposed peninsula or island a floor outline and work through the flow around it before you go any further. Your supplier will of course need to check the final dimensions against the appliances, services and access requirements of the household.
Layer light around tasks and meals
Look at the prep area whilst you’re standing where you’re cooking. If your body blocks the ceiling light then you’ll need to plan another suitable light source over the working surface. Where possible keep the task lighting and the dining light on separate switches so that one setting doesn’t have to cater for all the activities.
A rounded pendant can go a long way to soften a room full of straight cabinet lines. You’ll need to consider the size, position and material of the pendant in relation to the location. A paper or fabric shade might be ideal for a dining room, but be sure to check the care instructions and the manufacturer’s requirements before placing it in an area where it will be exposed to cooking heat, steam or grease.
View your finish samples under the lights you’re going to be using. A warm lamp can completely change the appearance of cream, timber and clay from their daylight colour. Make sure your working area still has the light you need.
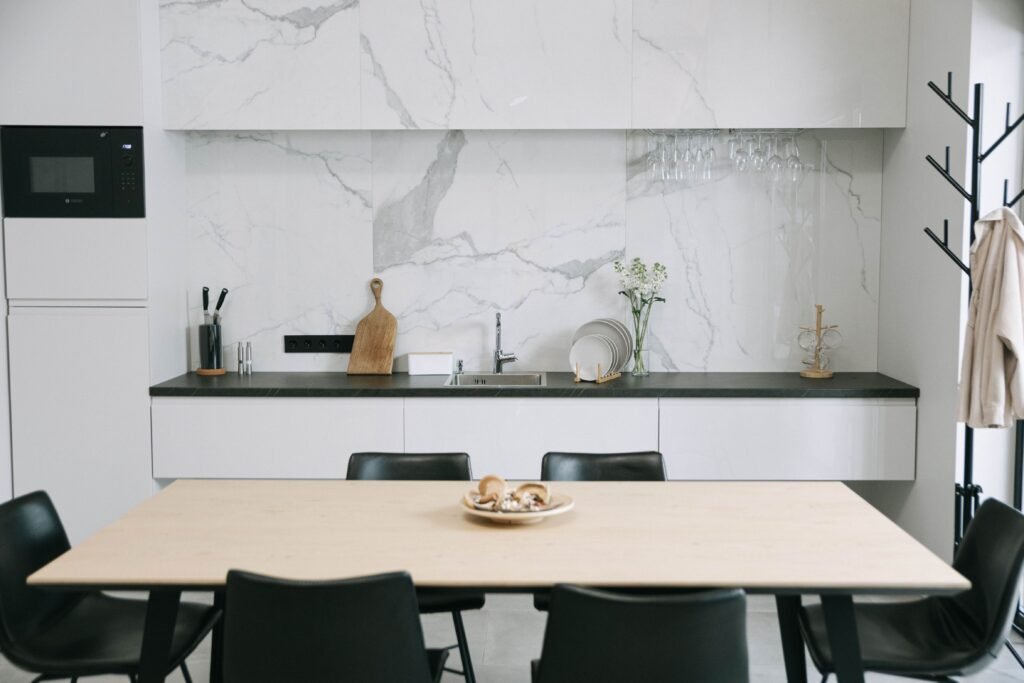
Add character through objects you use
A hand made mug, an inherited bowl or indeed just a familiar table can give the scheme a real connection to your own life. Keep the prep surface available and give the displayed pieces plenty of space to be seen.
At the table comfort is everything: chairs you can actually sit in for a meal, a light that doesn’t glare into your eyes and space to put down the serving dishes. Our hygge decor ideas look at how you can arrange the home for ordinary, unbroken time.
Can you create a Japandi kitchen without a renovation?
Yes. Start with a palette that works with your existing floor and fronts. Clear a useful surface, get your most frequently used items within reach and compare a few variations in terms of handles, textiles and lighting. Always check compatibility and installation requirements before you go ahead and replace any fittings.
If you’re planning on painting the cabinet doors, identify the existing finish and then follow a coating system appropriate to that. Keep the good furniture that’s already in the room. A kitchen can be built up over time as you work out what changes will make cooking and socialising in the kitchen easier.
Place your floor, cabinet, and worktop samples on a board and leave them in your kitchen for a few days. Check how they look in the morning, during dinner prep, and with the main lights on. Pick the combination you like best at all those times.
Sources
- IKEA: Japandi style inspiration
- IKEA: SINARP oak-veneer door specifications and care
- FENIX: Everyday cleaning

Parker is a home and lifestyle writer at The Scandi Home, where they share a love for Scandinavian design, cozy living, and thoughtful interiors. Their writing focuses on simple, functional spaces that feel calm, warm, and lived-in.